

This post was originally created on MoreHue.com
Introduction
A few weeks ago, I was introduced to the Philips Hue Light. It seemed a little pricy for a lightbulb. Nevertheless, it tickled my curiosity enough to give it a shot. I bought the white ambience starter pack — as I really do not like the pure white glow — together with two Hue Play Light bars.
If you have read any of my other stories, you already know that I like to automate publishing websites, pipeline adjustments and Instagram embeddings. So of course, I wanted to automate the controlling of my smart lights as well. When I am unlocking my PC, I want my Hue Play Lightbars to turn on automatically and to be turned off when I lock my screen.
In this story, I will explain to you the basics of programming Hue Lights with PowerShell and Windows task scheduler.
The stages
- Find the IP address of your bridge
- Get an authenticated username
- Find the lights to automate
- Create your desired scripts
- Define the scheduled tasks
1. Find the IP address of your bridge
Fortunately, the Hue system comes with an API which can be controlled easily through web requests. But before we can try anything with our Philips Hue lights we first need to find out the IP address of our bridge. The bridge will be the receiver of all our web requests. A very nice tutorial can be found here. But as we only need the IP of our bridge for now we can also go to this link: https://discovery.meethue.com/.
The link will show you a small JSON response with the internal IP address of your bridge. The response will look somewhat like this:
[
  {
    "id": "ecbdsa5afffe1303cf",
    "internalipaddress": "192.168.1.41"
  }
]
Write this IP address down as we need it in the other steps.
2. Get an authenticated username
As any other protected system nowadays, the Hue system requires a user to authenticate him or herself. But before we can do this we need to navigate to the following URL (this is the sandbox URL of our bridge): https://<bridge_ip_address>/debug/clip.html
Now we need to send an authentication request to authenticate ourselves. Send a post request to the URL /api with the following message body { "devicetype" : "My_amazing_computer" } . You’ll then see the following message:
[
 {
  "error": {
   "type": 101,
   "address": "",
   "description": "link button not pressed"
  }
 }
]
Now go and press the link button on your bridge and then press the POST button again. You should now get a success response like below:
[
 {
  "success": {
   "username": "j5hvYCkJPN8a87daQ6a0mmxBcG6ozeLp3zXU5lgc"
  }
 }
]
There you go! You now have your authenticated username. Write this one down as well, we will use it in the next stage.
3. Find the lights to automate
With the authenticated username we just got from the previous stage, we can get all the lights connected to our bridge. To do this send a new request in de API sandbox to:
https://<bridge_ip_address>/api/<authenticated_username>/lights
This will give you a JSON response with all the lights in your system. All these lights will have the same name corresponding to them as you will see in the Hue app. For my example, I will use the lights 1 and 2 — the id of my lights — .
4. Create your desired scripts
Now that we have our bridge IP, authenticated username and lights to automate we can begin with some real programming! In this part, we are going to write two scripts. The first one will turn on our Hue play bars while the second one will turn them off. The code to achieve this is written in PowerShell as we can easily fire web requests with PowerShell in Windows. The code below is used to turn off the lights:
# Hue Bridge
$hueBridge = "http://192.168.1.41/api"

# Username
$username = 'j5hvYCkJPN8a87daQ6a0mmxBcG6ozeLp3zXU5lgc'

# Command to Turn on
$apicontent = '{ "on": false }'

# Invoke commands
Invoke-WebRequest -Method put -Uri "$($hueBridge)/$($username)/lights/1/state" -Body $apicontent
Invoke-WebRequest -Method put -Uri "$($hueBridge)/$($username)/lights/2/state" -Body $apicontent
The variable $apiconent is used as the POST body of our request. In this case, two POST requests will be done to turn off the lights. An example URL looks like http://192.168.1.41/api/j5hvYCkJPN8a87daQ6a0mmxBcG6ozeLp3zXU5lgc/lights/1/state with the following JSON body { "on" : false }.
The script to turn on the lights is almost identical except that the $apicontent changes to { "on": true}. Save these scripts to a folder of your preference.
5. Define the scheduled tasks
In the last step of our lights automation process, we will need to define when the above-written scripts need to run. Luckily, Windows has something called the Task Scheduler to couple any actions to specific actions within windows.
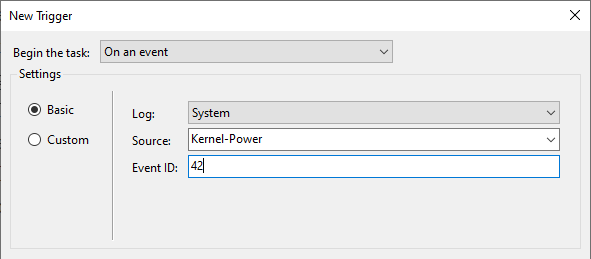
First, we are going to add the task to turn off our lights. Open the Windows Tasks Scheduler, click on Action and subsequently on Create Task…. Go to the Triggers tab and define a new trigger. I added one trigger with as begin task On workstation locked and added it to our triggers. Then I added another one for sleep mode. This one is a little more complex, we add a new trigger On an event with as log value System, as source value Kernel-Power and event ID 42 (the event for sleeping). This will look like this:
Now we need to couple an action to the defined triggers. Go to the Actions tab and add a new action. Leave the Action as Start a program. In the settings section, fill in powershell as the program to run. Now add the following arguments -windowstyle hidden -File C:\Documents\HueScripts\turn_off_play.ps1 and click on OK. Your Actions tab will look something like this:

Well done! You are done with your script to automatically turn off your Hue lights! Go and check it out before we continue with the next step.
Turn lights on
Now we need to do the same to turn the lights on when you computer awakes. This process is almost identical to the task of turning off the lights. I will now point out the differences for this task:
- Change the locked trigger to On workstation unlocked
- Change the event ID to 1 (computer waking event)
- Change the filename of the action
Conclusion
Automating is easy, you just need to know which steps to take. In this tutorial, we found a way to automate our Hue light bars depending on the state of our PC. Let this be the beginning of your home automation journey.
If you come across other neat automation techniques, please let me know!
Happy coding!
This post was originally created on MoreHue.com