Introduction
I think every programmer will recognize the following situation. You just began with your coding adventure and all of a sudden you get THE best website idea ever! You start coding and after a few intense programming days, you realize that it’s time to show your website to the world. But how do you do this, and furthermore how do you ensure that the costs remain limited? In this blog, I’ll explain how to publish a website with its own domain for less than $1. In this blog I’ll make use of NuxtJS, but of course, this can also be done for any other static website.
By the way, if you want to read more about home automation, I would like to refer you to my other site MoreHue.com hope to see you there soon.
The plan
To host a website, there are a few things you need to take care of:
- Buying a domain
- Define where you want to host your website
- Uploading the website to the hosting provider
All these parts are discussed in the following chapters.
Buying a domain
There are dozens of Domain registrar websites where you can register a domain. Think about huge international companies like godaddy and domain.com. But of course, it’s also possible to join smaller companies for example from your own country. As I live in the Netherlands, the two biggest competitors are TransIP and Mijndomein.
In the meantime, I have enough experience with most of the above-stated domain registrars to know a fair bit about them. GoDaddy is by far the cheapest — With only $0.99 for your first year — , but my personal preference goes to TransIP as you can change everything to exactly how you want it and I’m supporting a local company.
Via your selected domain registrar search page, you can check whether your domain is still available or not. A .com domain at GoDaddy is as cheap as $0,99 for your first year.
But of course, buying a domain is just the start! We now need to configure it, but before I’ll explain how to configure this domain, we’ll first have to determine where we’ll host the newly created website.
Determine hosting provider
Just like buying a domain, there are all kinds of options for hosting your website. For example, there is the option to have the hosting handled by TransIP or GoDaddy. Hosting a static website at TransIP costs $5.99 per month. If you want to host a static website at GoDaddy, this will cost you $3.99 per month. But as outlined in the introduction, you would like to limit the costs for your new idea, since you are yet not sure whether people will like it.
So what if I tell you, that hosting a website could be FREE — and I really mean free!
Netlify
After gaining experience with GoDaddy and TransIP, I started looking at other options. I was wondering if it was possible to have a website hosted somewhere else which was cheaper than the before mentioned companies. This is how I ended up at Netlify. Netlify offers users the option to host static websites for free. But is that even possible? There must be some catch, right?
The catch
WWhen a company offers something for free, they usually do this with an underlying thought. For example, they give you something for free now so that you, at a later stage, purchase another product from them that you do have to pay for. This is of course also the case with Netlify, but remarkable is the functionality they provide for free users. Namely, you can create an infinite number of websites with them, you get 300 build minutes per month to automatically publish your website via GitHub, and you get 100 free forms submission per month.
However, there are limits to various features. As you can “only” use up to 100GB of bandwidth per month and you run 1 build at a time. All in all, Netlify offers everything you need for hobby programmers.
Within minutes of creating your account, you can begin with uploading your website to the platform.
Upload your website
It is very easy to upload a website within the Netlify portal. But pay attention! Before you upload a website, it is important that you do not upload a development environment but instead you upload the production environment, as this could show your user information that you don’t want.
In the case of a nuxt blog you need to run the following command in your project folder npm run generate. This will create a dist folder in which your production website will be placed.
Are you lacking a NuxtJS website or another static website? No problem, you can also download an example website via free-css.com.
The only thing left to do is to click and drag the folder to the Netlify website and there you are! Congratulations on your first FREE Netlify website.
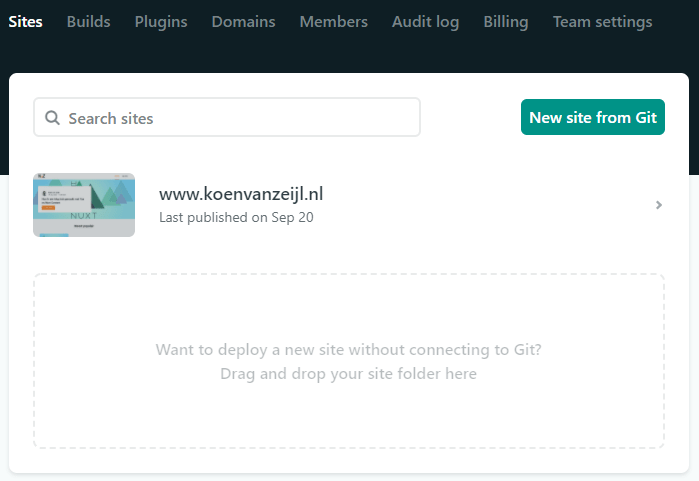
Netlify creates a x.netlify.app website for you which you can easily change in your website settings to yourwebsitename.netlify.app. However, this is not yet the domain we just bought. I’ll explain how to set this up in the next chapter.
The configuration
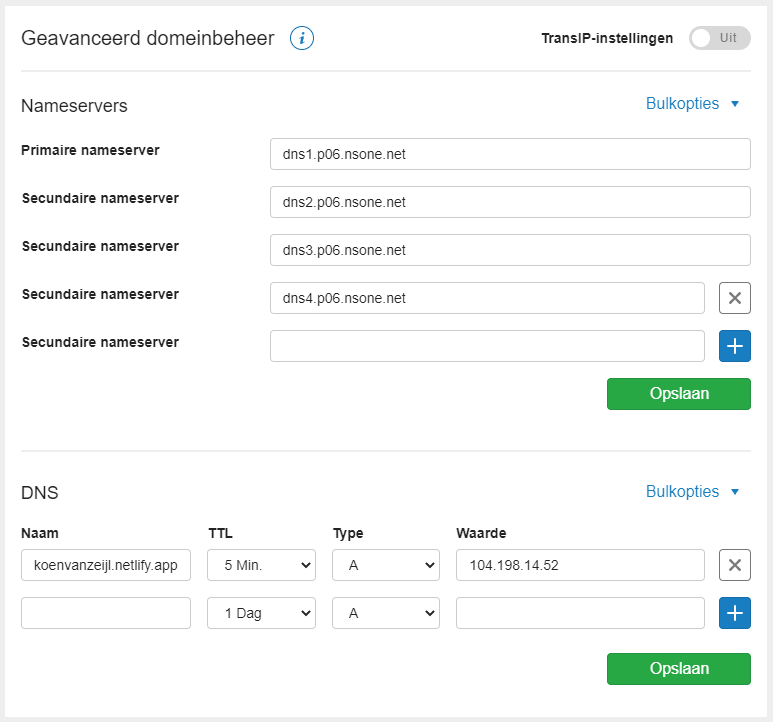
After buying a domain and creating a Netlify website these 2 services only need to be linked together. Within Netlify, go to ‘Domain settings’ and press ‘Add custom domain’. Here you enter the domain that you purchased earlier and indicate that you want to add the domain. Then press ‘DNS configuration’ to see which IP address your newly purchased domain should point to, here you will also find the nameservers.
Now you only have to fill in these details at the domain registrar of your choice. Below I give the example of koenvanzeijl.nl. Fill in the nameservers and create an A-type DNS record to point to the given IP address by Netlify.
Please note it can take up to 24 hours for the DNS to be set correctly.
Conclusion
So it’s certainly possible to host a website with your custom domain for less than $1. You just have to figure out the best way to do this. I hope that I have been able to help someone with this story to publish his or her hobby project to the world, because who knows what it will become!
Have you created a website in this way or do you have any other tips? Let me know in the comments.